I’ve finally had a go at creating a notebook using leather as a cover! It’s been something I have been wanting to do for a long time but if you wanted to buy any leather it was always to expensive to get to “give something a go!”.
But, I don’t know why I didn’t think about it before, but I managed to find two nice big bits of goatskin leather on eBay for around £20. For that price, you can’t go wrong.
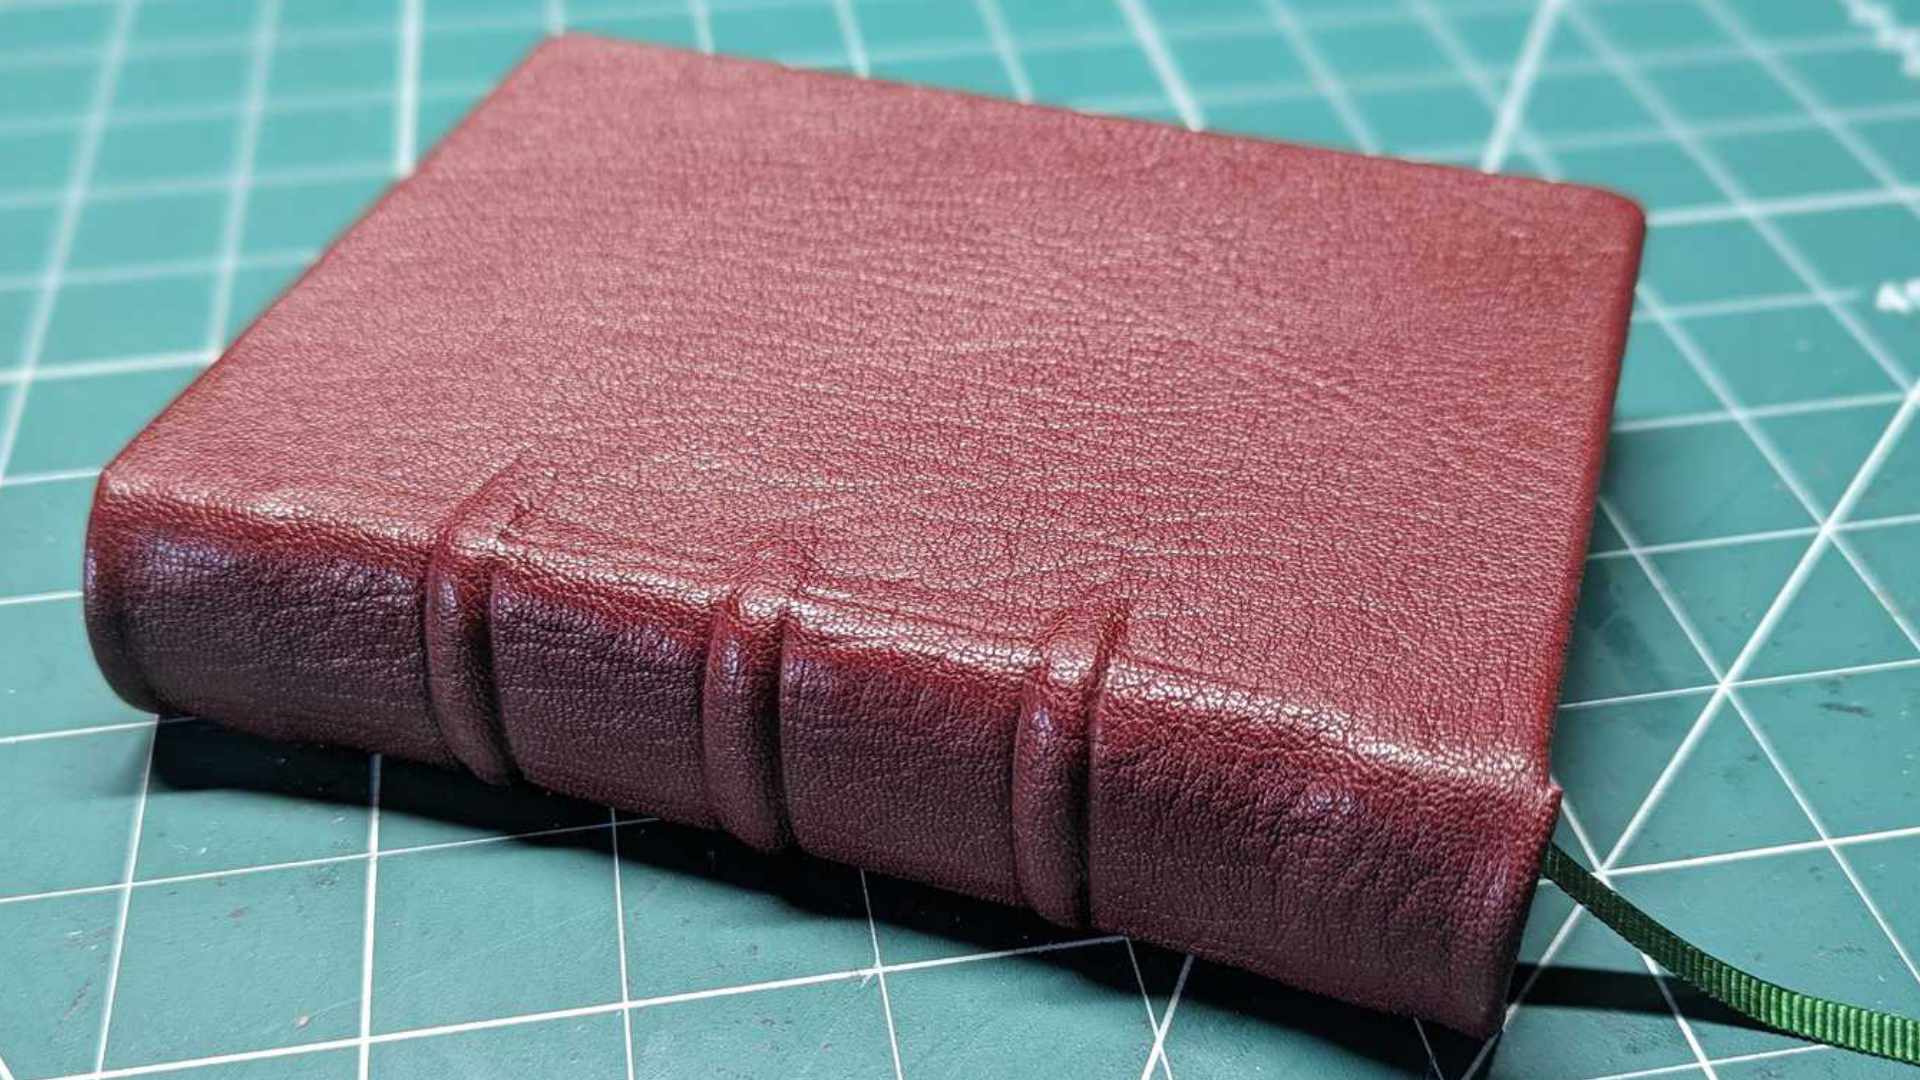
While I was having a go at covering a book with leather, I wanted to have a go at giving the spine of the notebooks a raised band on the spine. This would give the notebook more of an old-fashioned traditional look to it, which is something I’ve always loved and wanted to try. I also made another notebook during this time which had a double-raised band on the spine.
The text block
I made the text block as you normally would, however I used string or jute to create the raised bands/double raised bands. I’ve made the notebooks an A6 size.


Once I had finished sewing the signatures together and gluing the spines, I then cut the edges.
Cutting the fore-edges
I’ve always used my guillotine to always cut the fore-edges of my text blocks, but now that I’ve got a couple of finishing presses I thought I would try and cut the fore-edges using a sharpened chisel.


This worked well, and I was pleased with how it turned out. But I do need more practice at this because it wasn’t quite a 90-degree angle to the other edges. So I must admit I needed to use the guillotine to resolve this. But for my first attempt, I was happy with it. I’m happy to say I’ve tried it and will keep at it!
Rounding the spines
On the first attempt at rounding the spine of another notebook, I felt I did a good enough job, but I knew it wasn’t perfect and needed practice. So, this was another attempt at giving it a go for me.
When I was making the second notebook with the double raised bands, I purchased a finishing press, and using this to round the spine made a big difference.

But otherwise, even without the new finishing press, I felt I did a great job with the single-raised band. Here are some images for both below:


Once I had finished the rounding of the spines, I then added a ribbon for the bookmark, backed them with mull and paper, and finally cut the boards for the covers where I attached them to the text block.


Endbands
I tried something else new that I’d always wanted to have a go at for the first time. And that was to have a go at my own end bands rather than use machine-made ones.
I’ve always loved the handmade end bands and always thought that they were extremely complicated to sew. But I knew I had to have a go at this as seen as I was doing traditional bookbinding with the raised bands and using leather as the cover.
So, I watched a load of YouTube videos to see how it was done and believe me when I say this, once you get the hang of it it’s not as complicated as I thought it would be. And I was surprised at how much easier it was to do! The best video I found that helped me, and was easy to follow was by DAS Bookbinding (he has a great channel on YouTube).
Don’t get me wrong, I wasn’t a natural at it the first time I gave it a go, as it did take me a while to do my first one. But once you get the knack and get into the rhythm it does make a difference to the look and feel of a bookbinding project.
You can see in the images the work I completed on both notebooks I had worked on, even Shadow helped out:


I’ve since done about 3 notebooks while writing this post, and I must admit I love making end bands from scratch. It’s such a pleasing and satisfactory process.
Leather cover
I cut the leather down to shape and started gluing the leather to the spine first while in the finishing press. I wet the leather on the inside before gluing it down to make it supple, I stretched the leather over the spine so that the raised bands started to show through, and also used the bone folder to help even further.


Once I had positioned the leather on the spine and glued it down, I then used thread pulled tight over the raised bands and pegs on the press, then let the glue dry.


Once the glue had dried, I then cut and folded over inside the leather at the top and tail of the spine, made sure it fit correctly, and then glued it in place.


When everything was dried on the spine, I then glued the cover down, as well as the turn-ins.


I don’t have a paring knife to thin down the leather at the edges for the turn-ins. I did try to see if I could use a regular scalpel-type blade but that just doesn’t work, which I thought would be the case.
With this, I didn’t try to thin the leather at the edges in the end, but they were still too thick (2mm to be precise). So I had to cut some card that were 2mm thick to size to fill in the gap.


I just then had to glue down the endpapers to the cover. I then pressed them in my press overnight.


Final thoughts
Overall, I’m very pleased with the final notebooks. I need practice and I know where certain parts I can improve on. One tool I’ll need to get for sure is a paring knife so that I can thin down the leather where necessary.


